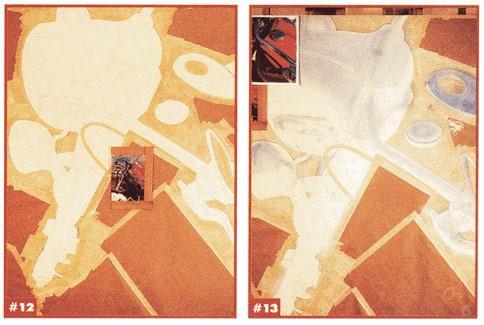
 Start by masking the upper black parts of the engine. The edges of the cooling fins of the engine are masked for protection since they will be very light and receive very little paint. Once the complete area is initially masked, I take 1/8” tape an go over the fin edges so that I can quickly remove those strips and spray the edges without having to mask the whole area over again. At this point, I’m primarily concerned with the engine, so I cover over the spark plugs wire and other items that will be addressed later. I’m also going to paint the tire and a couple of other dark areas at this time so I mask those too. I start painting the engine areas by spraying few light coats of opaque Black, and continuing until the areas are painted solid. Using a few hand-held templates, I come back and work in the details with a fine stipple spray using opaque Raw Umber, and when that’s complete, I finish the engine’s black areas with some transparent Smoke. When finished, these areas will be pretty dark so that the engine looks black, but still retain some speckle details so that it doesn’t appear too “graphic”. Once the dark areas of the engine are finished, I remove the 1/8” tape strips I applied earlier and lightly spray the details using transparent Smoke and transparent Ochre. Because of the soft rubber nature of tires, the shadows and highlights are all sprayed freehand. I’m not looking for any crisp lines within the tire’s shape. I start by creating the general shape of the tire with a few light coats of transparent and opaque Blacks. Highlights are added with a mixture if opaque White mixed with opaque Raw Umber. Next, I use opaque Raw Umber darkened with a couple of drops of transparent Smoke to give it an earthy feel, and finish the tire off with some straight transparent Smoke and transparent Ochre. The tire’s finishing touches include a touch of transparent Bright Red that is reflected from the motorcycle’s fender. The rubber parts of grip and shifter peg are painted using opaque and transparent Blacks, transparent Smoke, and earth tones I’ve used previously. To create the textured effect I use a 4” Chinese bristle house painting brush and airbrush. I create a stipple texture with the airbrush, and quickly brush the paint with the bristle brush so that the texture wraps around the surface. This process is done with all the colors to visually blend them together.
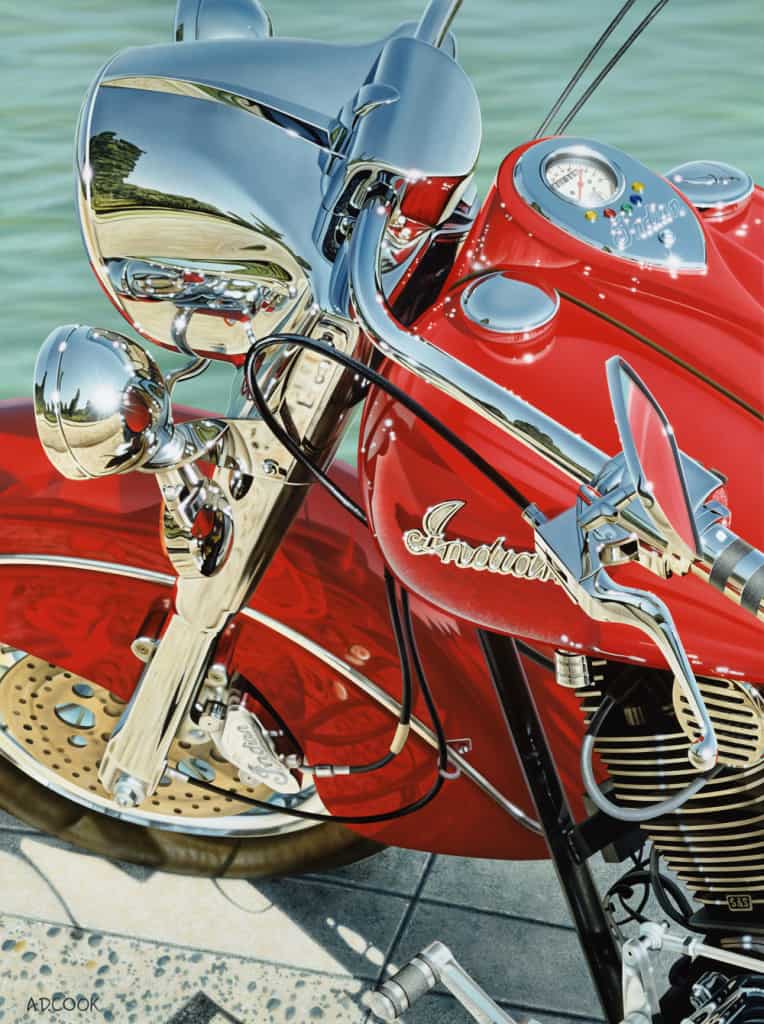
Using masking tape and paper, I mask the entire chrome area as one big piece. Once I start spraying, I’ll tackle all the chrome areas at the same time for consistency. I use a lot of acetates to define the crisp edges within the masked areas and also mask sections within the greater masked area to paint individual pieces. Before I begin the process of actually painting the chrome pieces I start off by tracing many of the more complicated shapes onto tracing paper. This gives me an opportunity to define some of the more complex shapes. An example of this is the embossed logo on the dash. The reference photo I’m painting from is quite vague in this area, so additional reference photos are needed. Fortunately, I shot nearly a hundred photos of this motorcycle before beginning the painting, so I have plenty of additional reference material on hand.
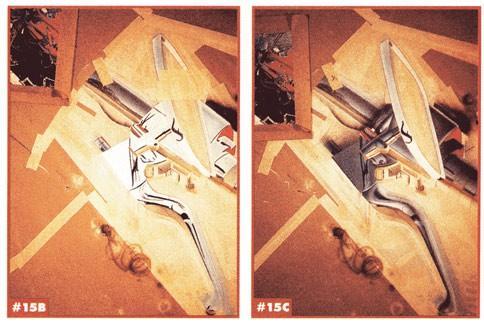
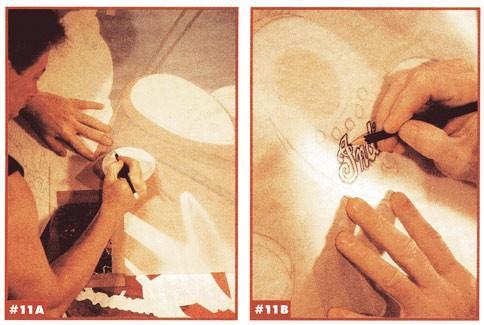
Next, I use a small fine line paintbrush to paint black solid areas and lines. These go pretty fast since I’m creating crisp edge lines. A brush for this application is the logical choice, rather than cutting a lot of acetate masks at this point. Painting these areas with a brush also allows me the time to seriously study my subject matter in detail. A mahl stick is a very handy tool when hand-painting areas of this size. Mahl sticks are available at most sign supply shops and are used to support the hand above the surface of the painting. As I hand-paint with a brush, I only use black where black exists. My objective is not to outline everything in black; I’m creating a “realistic” looking piece here. So, while the chrome is looking quite bold at this point, my plan later is to airbrush over much of the black to add highlights, color, and detail, as well as soften some of the crisp edges a little.
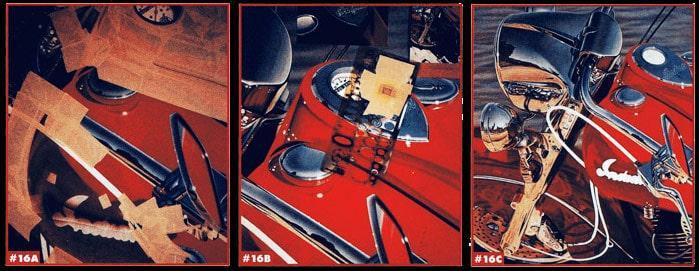
Once the black is painted, I airbrush more chrome blues, whites and other colors using cut acetate stencils. First, I spray my “chrome one”, which is the brighter blue of the two. Then I spray my “chrome two” to define the shapes. Once my blues are sprayed, I airbrush my browns, blacks [transparents and opaques] and white. After I’ve airbrushed my colors, I go over the black again and add whites with a fine line paintbrush to create contrast. Sometimes, I throw in a few brushed lines of the other colors [including chrome blue] as well. I completely finish the masked areas before moving to other crisp chrome pieces, but I paint them all the same way for consistency. Since there are a lot of chrome pieces in this motorcycle, I paint many different areas at the same time by looking for pieces that are similar in reflected colors. This also helps to minimize masking. I started with the headlight nacelle area due to its shape and reflective intricacies. After masking the nacelle, I use my chrome blues and whites to paint the sky’s reflection in the nacelle. Ultimately, painting chrome is a process of working with both airbrush and paintbrushes to create the final illusion. The green trees reflected in the chrome are actually all hand-painted with a brush, much like a watercolor painting. I’ve used varying blends of opaque Chrome Green, opaque Moss Green, blacks, and transparent Ochre. To create deep rich colors, most of the trees have been painted three or four times using airbrush paint applied as several light layers. The greens appear many times throughout the painting, which helps to add even more believability to the finished piece. Once I’ve finished airbrushing the chrome pieces, I take my tracing paper with the dash logo and transfer it to the canvas by applying lead on the backside of the paper and tracing it onto the canvas. I then paint the logo’s outline with a fine paintbrush with light blue. While this initial step of outlining with a brush is important, it’s by no means final. Later, I’ll airbrush the highlights as needed.
- About the Author
- Latest Posts
- More info

A.D. is an artist who started drawing at a young age. Throughout his life, he has worked with different creative tools in traditional and digital art and design. His art and writings have been showcased in various publications such as Airbrush Action Magazine, Airbrush Magazine, American Art Collector, Art & Beyond, Dream To Launch, Easyriders, Las Vegas City Life, Las Vegas Weekly, L’Vegue, ModelsMania, Quick Throttle, and The Ultimate Airbrush Handbook.