INDIAN SUMMER
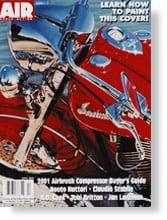
Published in Airbrush Action Magazine, April 2001
Size and Surface: 48” x 36” on 100% pure cotton duck stretched canvas. For this painting, I’m working on a Monet Master Wrap Canvas by Masterpiece Artist Canvas. Additional preparation includes several thinned coats of acrylic matte medium.
Equipment and Materials List
- Artograph® Projector
- Iwata Shark™ Great White Compressor
- Iwata® HP-C™ Airbrush
- Hand Masker Paper/Tape Dispenser
- Masking Tape – 1/8”, 1/4”, 1/2”, 3/4”, 1-1/2”, 2” and 3” rolls
- 12” Masking Paper (rolls)
- X-Acto® Knife with #11 Blades
- Artool® Freehand™ Airbrush Templates
- Mahl Stick
- 4” Chinese Bristle Brush
- Acetate Sheets
- Canvas
- Golden® Matte Medium
- Frisk® Canvas Mask
- Com-Art™ Transparent and Opaque Paints
- 3M® ReMount Repositionable Spray Adhesive
- Krylon® Crystal Clear Acrylic Coating
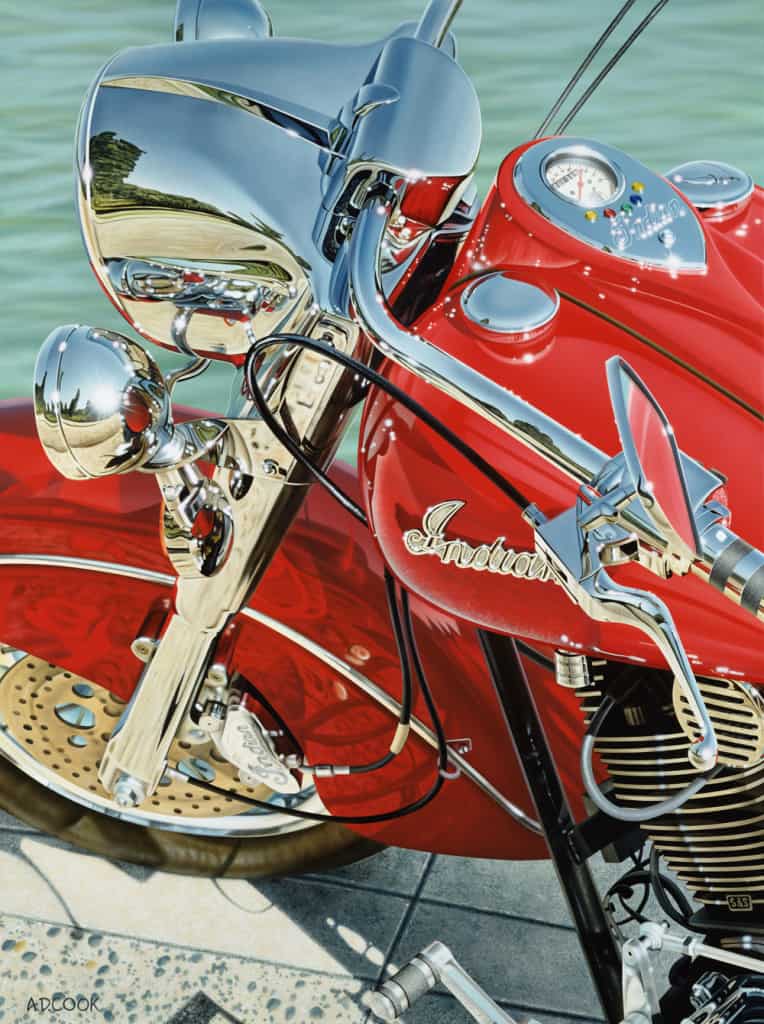
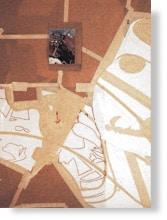
It started in October on a beautiful Indian Summer day. In Oregon, those kinds of days are rare, especially in autumn. So, I called my buddies at Indian Motorcycle of Portland and asked them if they had a bike I could borrow for the afternoon. They were kind enough to offer me anything on the floor, and a hot red Indian Chief caught my eye. I’ve wanted to take one of those out for a spin for quite a while, and the day and the opportunity were perfect.
The Chief and I made our way to a cool Portland park with a pristine pond. So after shooting a couple of good rolls of film, I had reference material for my next painting – the fifth in an ongoing motorcycle series of works.
I prefer to work from my reference photos because I like knowing the painting is mine from beginning to end, and I enjoy the process of shooting good reference material. The method also helps me to better understand the subject matter at hand. Additionally, I know there won’t be copyright concerns using my photos versus painting from someone else’s images. When I process the film, I always order two sets of prints. This allows me to have a backup print in case my reference material gets damaged or lost while working on the painting. You don’t want to be left without your reference photo under a tight deadline and have to wait for new prints to be made.
Step 1: Transferring Your Drawing to Canvas
I begin each painting by projecting my reference material onto the canvas and drawing it with a 9H pencil. Once the image is drawn, I spray the complete canvas with a workable fixative, allowing me to work on the piece without smudging the lead. When projecting your image, the goal is to put enough information on the canvas to work simply. Not every detail is necessary for the drawing process, but you must draw enough to fully understand what you’re about to paint.
I’ve applied several coats of Golden Matte Medium thinned with distilled water over the drawing. Matte Medium works as a translucent ground to prepare support when an opaque gesso is not desired. This process will help to smooth out the canvas’s surface and create a nice surface for spraying. Next, I lay the canvas flat and use my hands to massage the Medium into the surface. By doing this, I’ve also wholly sealed my drawing into the painting, assuring me there is no way to smear the pencil drawing. Finally, allow at least a day for the Medium to dry between coats. This painting required six separate applications of thinned Matte Medium.
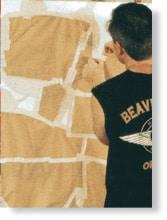
Step 2: Masking
Because of the scale of my work, I tend to work with masking tape and hand masking units with masking papers. Don’t cut corners on the quality of the masking tape. In my experience, 3M masking tape works best because it doesn’t leave residue on the canvas’ surface. I keep 1/8″, 1/4″, 1/2″, 3/4″, 1-1/2″, 2″, and 3″ rolls on hand.
For masking paper, I prefer 12″ wide rolls commonly used by house painters. Additionally, I find painter’s tape [which is available in 2″ and 3″ wide rolled paper with a light adhesive on the back] very handy for the quick masking of small areas.
The above tools and materials are available at most hardware stores, sign supply shops and home improvement centers.
Initially, I start by outlining and masking the shapes with 1/8″ and 1/4″ tape and other sizes as needed, then filling in the larger areas with tape and paper. Burnish down the edges of tape everywhere with your fingers, and where they cross over other pieces of tape, use your fingernail to burnish the intersections. Burnishing prevents the paint from seeping under the tape and which would leave a rough undesirable edge. For highly detailed sections, you can lay down a large piece of masking tape or Frisk Canvas Mask and cut pieces out with an X-Acto knife. Always use a new blade and be careful not to cut into the canvas’s surface.
It’s important to ensure you thoroughly mask and paper over everything you don’t want overspray to find. Please don’t assume that because an area is several inches from where you’re painting, it won’t pick up overspray, as overspray tends to travel quite a distance, especially when painting larger areas.
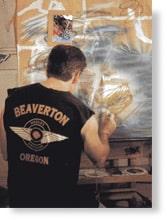
Step 3: Painting The Background
I start by spraying my background with an Iwata HP-C airbrush. Com-Art transparent and opaque airbrush paints will be used for the complete painting.
The water background in this painting is a murky duck pond, so I’ve started to block in the water areas with a mixture of Opaque Phthalo Green mixed with Opaque White to create a soft watery green. The darker of my blue greens are a mixture of Opaque Phthalo Green, opaque Chrome Green, Opaque Cerulean Blue, and White. These are only base colors; I will add many other colors to create a realistic yet soft-focus background. Additionally, I use a little transparent Forest Green thinned with a couple of drops of Transparent Smoke to give the water a murky look.
I paint my water with my canvas flipped over so that the top of the canvas is at the bottom. Flipping the image makes it easier for me to see the shapes of the water rather than what I think water should look like. I start by spraying wavy patterns with blue greens and blue blends. Next, I lightly sprinkle the entire area with various blends of white mixed with opaque Cerulean blue of the colors to soften the background colors.
Step 4: The Sidewalk
Unlike the water, the warm concrete sidewalk ground is painted to look rough. I start with light cream colors, which I’ve made by mixing White, a little Opaque Raw Umber, and a couple of drops of Transparent Black to create a dirty white for the concrete’s base color.
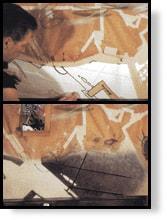
For the cast shadows on the ground, I’ve mixed some White, opaque Black, added some blues, and a little opaque Orange. Before painting the sidewalk, I copy what I have drawn on the canvas onto acetate. This is important because the shadow position will be critical in creating a believable resting place for the motorcycle. Be sure to mark the acetate for the position so it can be accurately repositioned later.
I first painted the complete sidewalk area with my lighter colors, then placed my acetate templates with 3M ReMount Repositionable Adhesive and airbrushed the shadows. Next, I use my Iwata HP-C airbrush with the nozzle off and the air pressure set low to add stipple texture in the ground.
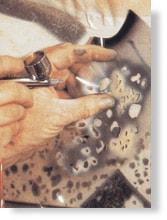
Step 5: Stenciling Details
Using a stencil burner, I burn several holes of various sizes in a piece of acetate to create a mask for the stones in the concrete. The template I’ve created for this painting is about 8” x 6” with about 30 holes. Most holes are only about 1/4” in diameter, and others are as large as 3/4”. By making the pattern erratic enough, you can rotate the stencil and cover a lot of ground without it looking like a small stencil was used. Then, using various blends of browns and blues, I paint the stones and complete the ground texture. Once the paint is dry, you can remove the masking tape and paper. I like to give the painting a least a day before masking over painted areas to ensure it is thoroughly dry.
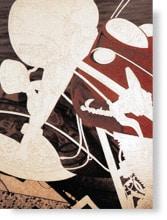
Step 6: Tanks and Fenders
I start the motorcycle by painting the tanks and fender first, leaving the chrome for last since all other colors are reflected in the chrome. I like the colors in my reference photo, so I’m painting the bike pretty much as I see it – red hot!
In preparation, I mask the areas to be painted in the same way I previously masked the background areas. I applied 2″ wide masking tape over the Indian logo and engine fins and cut them out with an X-Acto knife.
Next, I prepare transparent acetate sheets to define the crisp edges and reflection areas within the masked areas by drawing the shapes onto the pieces I plan on using later with a permanent fine-line marker.
If I need to create a crisp edge, I can either hinge the piece with some tape or use a little repositionable spray adhesive to hold the acetate masks in place while painting. If you’re looking for a softer edge, you can easily hold the acetate away from the surface while spraying.
It is best to use “real” acetate for this process because you can cut pieces out easier than “imitation” acetate. This is because acetate can be scored and cracked to pop the pieces out – other materials don’t necessarily allow you to do that. The advantage is that you can position your acetate where you need it, lightly cut the shape with a sharp blade without actually cutting it out, and bend the acetate to release the piece you need. There is no risk of cutting into your art; you can create a more detailed piece using this process. Additionally, I use Artool Airbrush Templates and other shields to create sharp edges as needed.
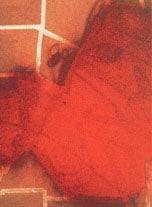
Step 7: Spraying The Red
Before starting, I mix enough paint to do all the reds and still have some left for the chrome areas and touch-up later.
My primary color mixture for the tank and fenders is opaque Deep Red, opaque Toluidine Red, and a little opaque Naphthol Red. I spray the red areas entirely with this color before considering shadows or reflections, which will come later. I’m simply establishing the bike’s base color at this point.
I start with horizontal strokes several inches away from the canvas’ surface. I follow those up with vertical strokes and then again with diagonal strokes. Lastly, I apply strokes that follow the lines of the bike. Between applications, I rotate the canvas to help assure color evenness – this is an excellent reason to ensure that the canvas is thoroughly masked to avoid overspray. My goal here is to have solid areas of color without any visible strokes or patterns. I’ve applied about ten coats to achieve an even color distribution of the red. Since I’m using opaque colors, all of the drawings on the canvas will be covered. That’s why transferring this information to acetate before painting in your base colors is important.
Step 8: Masking The Tank
Once the base “hot red” is finished, I carefully mask the tank to isolate it from the fender. Since most of the tank is already masked, I use 1/4” masking tape to outline the edge and use 12” masking paper to protect the fender areas. Again, it’s important here to remember to burnish the edges of the tape down with your fingernail so that the intersections [where one masking tape crosses over another] are crisp.
I mix approximately two parts “hot red” with one part opaque Phthalo Green [creating a deep red] for the dark shadow areas. I’ve used green for this because it is red’s complementary color. Many of the larger highlight areas include opaque White mixed with my hot red and a few drops of opaque Magenta to brighten it up a little. As I get into lighter and darker areas, I adjust the colors as needed. I also use straight white to under-paint some hotter areas and glaze over with the other reds.
Additionally, the tops of the tanks which get the most light will receive a light mist of transparent Bright Red to warm it up a bit. Since there is already some Magenta mixed into my opaque Red highlight color, it doesn’t take much to warm it up – I want to push the white back a little. I slowly build up my colors while painting the shadow and reflections by airbrushing freehand and combining acetates and hand-held shields – no additional masking is used for these areas.
The hot spots and glows are sprayed with straight opaque White. Often, you’ll see these glow with a little red halo (or glow) around them, but when they’re on red the halo goes unseen, so just using white is sufficient, so long as it’s not overdone. The red halo will be more obvious as we get into the chrome areas.
Once the tanks are done, I allow the paint a day to dry and move on to the fender. Because the fender is further from view than the tanks, I paint the shadows and reflections with a much softer edge. This is done by doing a little more freehand spraying, and when using templates, I keep them away from the surface just enough to soften the edges. This is done by hand-holding the templates or making a loop of masking tape and putting it behind the acetate to lift it away from the canvas’ surface. When doing the latter, spray with low air pressure [under 20 psi] and build colors slowly so that the paint doesn’t sneak behind the acetate and leave a shadow from the tape.
- About the Author
- Latest Posts
- More info

A.D. is an artist who started drawing at a young age. Throughout his life, he has worked with different creative tools in traditional and digital art and design. His art and writings are showcased in various publications such as Airbrush Action Magazine, Airbrush Magazine, American Art Collector, America’s Sports Car magazine, Art & Beyond, Easyriders, Las Vegas City Life, Las Vegas Weekly, L’Vegue, ModelsMania, Quick Throttle, The Ultimate Airbrush Handbook, America’s Sports Car, The New York Times, and The National Corvette Museum 2024 Annual Report.