
Published in Airbrush Action Magazine, December 2004
(updated December 2022)
Creating The Perfect Ultra-Smooth Canvas For Airbrush
by A.D. Cook
Canvas and fine art go hand-in-hand. But the readily available off-the-shelf canvas isn’t made for airbrushing. Even stretched and “prepared” canvas marketed to airbrush artists has a lot of weave texture, which may be okay if that’s what you want. However, I prefer a much smoother surface – something closer to the hot-press illustration board. Considering that, I’ve developed a process that allows me to paint on canvas that is smooth and forgiving and yields an incredible surface to work on.
So, I am often asked, “Why go to all the effort to prepare a canvas when other surfaces are available?”
In response to that, there are several reasons:
- An adequately prepared canvas is the perfect surface for acrylics and airbrush mediums.
- The finished painting is relatively lightweight compared to creating the same work on a board or metal surface of the same size.
- I like the process of painting on canvas. It is a flexible medium that is forgiving and readily accepts various mediums.
- Art on canvas appeals to people as “fine art,” whereas art created on an illustration board or some other surfaces have the perception of being illustrations. Traditionally, art collectors see the value as more significant when a painting is created on canvas.
- Canvas can be purchased or stretched to just about any size. I often work large, with paintings averaging twelve to twenty square feet and usually larger sizes, definitely more significant than available illustration boards.
- Canvas can be prepared satisfactorily, allowing me to paint on my desired surface.
- Canvas is durable. Paintings produced on canvas have the proven potential to last hundreds of years.
- Canvas doesn’t need glass to protect the artwork like works created on an illustration board.
Having made my canvas case, let’s get to work. For starters, just about any off-the-shelf canvas will do, but if you invest the time to create a work of art, start with a good quality, pure cotton canvas. I prefer gallery-wrapped canvases since they can be displayed nicely by simply painting the edges without a frame. Gallery-wrapped canvases are not visible staples on the sides, so the sides are nice and smooth.
If I’m creating a custom-sized canvas (something not available off the shelf), I wrap and staple canvas (that I buy by the yard) to stretcher bars in any size I need. By stapling on the back, I am creating a gallery-wrapped canvas. Of course, the gallery wrap may not be as crucial if you plan on framing the finished painting. Still, one thing to remember is that gallery-wrap canvases tend to come stretched on thicker stretcher bars that benefit since we’re putting the canvas through a bit of a workout.
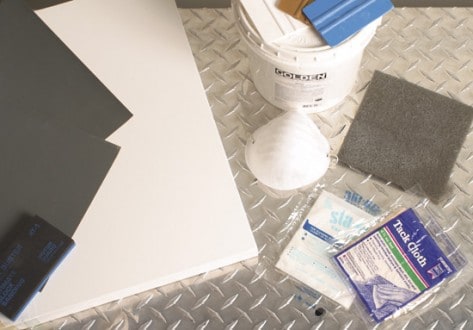
- Stretched Canvas
- Acrylic Gesso
- Squeegee – I prefer 3" x 5" ones like sign shops use to apply vinyl
- Small Bucket (or Something To Hold Warm Water)
- Sandpaper (the wet/dry kind that body shops use)*
- Sanding Backing Pad*
- Clean Cotton Rag (or absorbent hand towel)
- 3M Scotch-Brite™ Scuff Pad* – I use the gray ones, which are equal to 400-600 grit sandpaper
- Dust Mask*
- Tack Cloth*
(*) Usually available at automotive paint supply shops or auto parts stores.
For Las Vegas Artists
You Can Get Everything on This List at Desert Art Supplies
On to the fun part!
Step One — Applying Gesso
I buy gesso in the one-gallon tub for easy access. I can scoop gesso directly from the tub and apply it straight to the canvas. I prefer Golden brand Gesso Acrylique #3550-8, but you can use whatever works best for you (don’t skimp here – the price of good gesso and not-so-good gesso is negligible). Support your canvas on something vertical where you can easily access it. I use an excellent sturdy easel for this, but you could just as easily lean it against a wall. Apply gesso to the canvas with the squeegee. When applying the gesso, don’t scoop too much out at a time – just enough to use quickly.
Using long strokes, I spread the gesso onto the canvas and work it into its surface. This is important. The goal is to level out the rough surface and get the gesso to become part of the canvas, not just sit on the surface. Equally important is the process of applying very thin layers. It’ll take a few layers (or coats) to eliminate the canvas’s texture. Depending on how light or heavy you apply the gesso, it could take anywhere from five to ten coats. Apply your first coat as evenly as you can, but don’t worry if you miss a spot here and there. Let each coat dry thoroughly before applying additional coats of gesso. I rotate my canvas between coats to help create a more consistent surface. This also helps me see any areas I may have missed in previous coats.
Try, as much as possible, to avoid creating ridges when you apply the gesso. Some will naturally happen, but attempt to avoid them as much as possible. Don’t worry too much about gesso up – we’ll address that later. Continue to add layers of gesso until there is no more visible canvas texture, but keep the coats light. It’s better to have ten thin coats than two heavy ones. This process is usually spread over a few days to allow sufficient drying time between coats, so I like to prep multiple canvases simultaneously. As a note, if the canvas is cold to the touch, it’ll need more drying time before applying the next coat.
Step Two — Wet Sanding
Once the canvas has multiple coats of gesso on it, it may lack canvas texture, but you’ll have added other types of surface from the squeegee process – mainly streaks of gesso build-up and other imperfections.
The next step is to wet-sand the canvas to eliminate any texture you’ve added to the canvas. Ensure the canvas has cured (dried) for a day or two before wet sanding.
Wet sanding is a process usually practiced within the automotive industry. It involves using a particular type of sandpaper and water to achieve a smoother surface than regular sandpaper could ever create. For example, I use 320-grit wet sandpaper when sanding gesso.
First, fill your bucket with warm water and allow the sandpaper to soak for 15 minutes. This helps to soften the sandpaper and prepares it for use. This would be a good time to soak a clean cotton cloth with warm water and ring it out so it’s damp – almost dry but still a little moist.
Wrap the sandpaper around your sanding backing pad (or sanding block) and begin lightly wet-sanding the canvas focusing on the areas with the rises and imperfections. It helps to keep the canvas vertical while sanding. Be sure to keep the sandpaper wet throughout the sanding process, and use your damp cloth to wipe off any mess as you move along. Be especially careful not to get too aggressive in the sanding process. You’ll want to avoid sanding past the gesso and into the canvas material, which would cause damage and compromise the canvas. If that happens, you might have to start over with a new canvas (patience is essential here).
Rotate the canvas as you sand and continue to sand until the canvas is glass-smooth everywhere. I find it helpful to look across the canvas rather than at it to find any imperfections. I do this by moving my eyes to the edge of the canvas and looking across it with my light source light reflecting at its surface. Automotive guys will be familiar with this process. You can also run your hand along the canvas’s surface to feel for any imperfections. Essentially, the goal here is to create a surface as smooth as a piece of glass, or what I like to call “slate-smooth.”
When you’ve completed the sanding process wipe the canvas down with a clean damp rag and let it dry completely.
The next day I look over my canvas and do some additional wet sanding if necessary. This is my chance to fix any last concerns regarding the near-finished surface.
If I can see canvas texture, I can still add more gesso (back to step one), let it dry, and do some more sanding tomorrow. I can continue this process until I’m delighted with the canvas’s surface. Then, if it looks good, I can go to the next step.
Step Three — Scuffing the Surface
If you’ve followed these steps correctly, you’re probably thinking, “I have a beautiful smooth canvas, but paint’s not going to stick to this.” Unfortunately, you’d be right – not most water-based airbrush mediums, or at least not very reliably.
This next step will help with that. Take your Scotch-Brite™ Scuff Pad and lightly scuff the entire surface just enough to provide an even tooth, but be thorough. For your health, wear a dust mask whenever you sand gesso (or anything else) and work in a well-ventilated area. Gesso contains a high concentration of Titanium Dioxide, which is excellent for covering the canvas, but it’s not healthy to breathe.
The objective is to have a relatively texture-free surface with just enough tooth for paint to adhere to. Use a tack cloth at this stage to remove any dust created by the scuffing process.
Step Four — Priming The Canvas
Now you’ve got a nice canvas to work on, but it’s not quite there.
The last step is to prime the canvas with airbrush paint. I prefer to prime with the lightest color I plan to use in the painting, applying the paint with an Iwata RG-2 spray gun with a fan nozzle, or for larger canvases, I use an Anest-Iwata LPH-400 spray gun. For example, if I intend to use white in my painting, I use straight white to prime so that when I apply more white (or derivatives thereof), it’ll match the background and not look out of place.
You can prime it in any color you wish, but by all means, prime it. This is an essential step in creating an evenly finished surface. I recommend spraying multiple light coats of paint rather than one or two heavy coats. Each coat should be applied differently to provide an even finish with no visible strokes or patterns in the completed surface. To accomplish this, spray the first coat in horizontal passes, the next in vertical passes, then diagonal, and so on.
Allow your freshly-primed surface to thoroughly dry before drawing or painting on your ultra-smooth canvas (I typically allow 24 hours before working on it).
When you look at the finished canvas, it’ll have the look and feel of a large sheet of illustration board. Mine looks like a hot-press illustration board. It’s that smooth. You can’t see a speck of canvas texture in it looking at the front of the canvas. Most people would be hard-pressed to believe it’s even a canvas. I love the way paint takes to its surface. Although it’s an involved process, it’s definitely worth the effort if you want the feeling of a painting on canvas without the look of the canvas’s texture.
Cautions and Considerations
A Few Things To Keep In Mind Before You Begin
- Gesso is not putty or body filler. To prepare a canvas correctly, you must apply thin, light coats. Multiple thin coats are better than a few heavy ones. Don't be surprised if it takes six or more coats to eliminate the canvas's tooth.
- Patience is key. Each coat of gesso must have ample drying time.
- Any texture left in the gesso process will telegraph in the finished art, which is fine if that's what you want. Still, if you're looking to create an ultra-smooth surface, you'll want to carefully examine your canvas before beginning your painting and make adjustments if necessary.
Finally
It may seem like it takes a long time to prep a canvas with this process, but it’s not that involved once you start. The accumulated time in any canvas is just a few short hours overall, even for a large canvas.
The fun part here is to experiment. The outlined process works for me and yields a surface I like to work on. You may want to try different squeegees or sanding processes to see what works for you.
Suppose you want to prepare a canvas with a finish resembling a sheet of cold press illustration board. In that case, you can adjust it in the priming process by putting down more paint as a primer, stippling it to give it a slight texture, or adjusting your air pressure to manipulate the spray.
You can even vary the texture if you like – smooth in some areas – rough in others. The potential surface possibilities are endless. In the end, you’ll have created a surface that is beautiful unto itself, requiring only your art to enhance the canvas further.
By the way, I find watercolor pencils ideal for the drawing stage on the finished surface. The finished surface, as prepared above, is an excellent surface to draw on and accepts both pencils and paint quite nicely.
Experiment and have fun with the process.
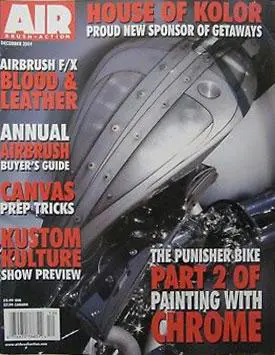
Airbrush Action Magazine, December 2004
CANVAS PREP TRICKS
Creating The Perfect Ultra-Smooth Canvas for Airbrush by A.D. Cook
post published: December 2004
updated: December 2022
- About the Author
- Latest Posts
- More info

A.D. is an artist who started drawing at a young age. Throughout his life, he has worked with different creative tools in traditional and digital art and design. His art and writings have been showcased in various publications such as Airbrush Action Magazine, Airbrush Magazine, American Art Collector, Art & Beyond, Dream To Launch, Easyriders, Las Vegas City Life, Las Vegas Weekly, L’Vegue, ModelsMania, Quick Throttle, and The Ultimate Airbrush Handbook.