A Study in Chrome and Reflected Surfaces
by A.D. Cook
The Ultimate Airbrush Handbook by Pamela Shanteau [ buy book ]
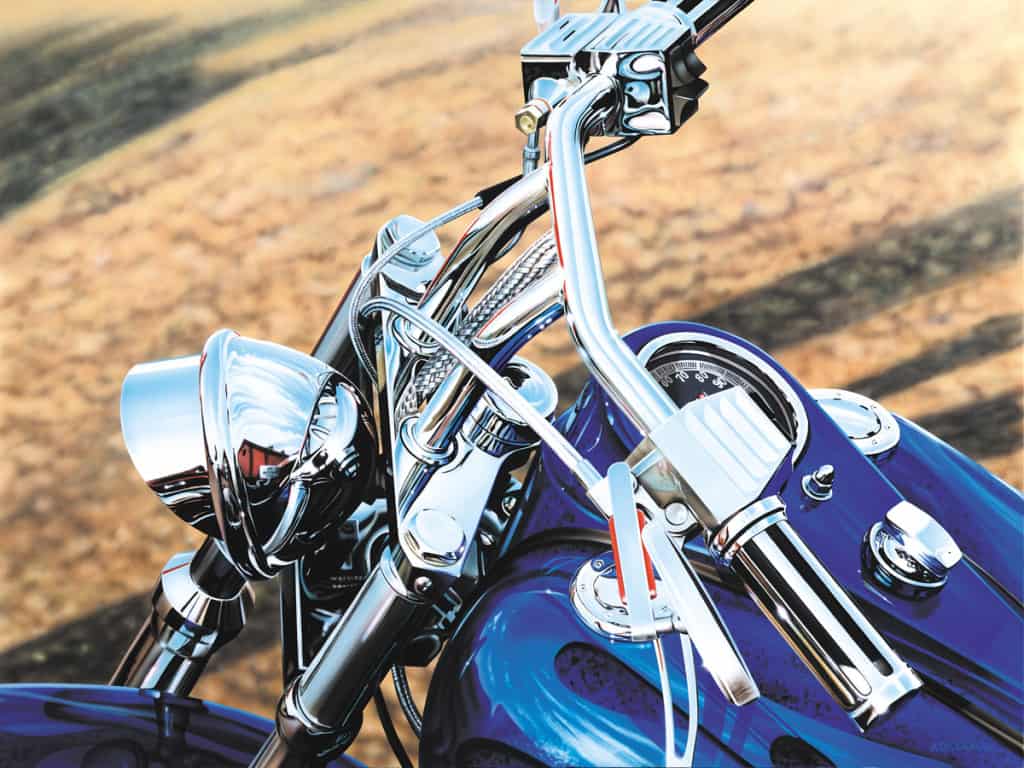
Title: Passing Time 9/4/00 - 10/9/00
Size and Surface: 36″ x 48″ on 100% pure cotton duck stretched canvas. Since I’m working with acrylic paints, it’s important that the canvas is prepared with acrylic gesso. For this painting, I’m working on Monet Master Wrap Canvas by Masterpiece Artist Canvas. The canvas has a nice tooth and is prepared in a pleasing way, so I’m using it as it is manufactured. Therefore, no additional preparation is necessary.
Equipment and Materials List:
- Shark Great White Compressor
- Iwata HP-C Airbrush
- ArtoGraph Projector
- Hand Masker Paper/Tape Dispenser
- Masking Tape and Paper
- Clear Acetate Sheets
- X-Acto Knife with #11 Blades
- Artool Freehand Airbrush Templates
- Mahl Stick
- Com-Art Transparent and Opaque Paints
- 3M ReMount Repositionable Spray Adhesive
- Krylon Crystal Clear Acrylic Coating
Step One: Transferring The Drawing To Canvas
I’ve projected my line art image onto the canvas from a reference photo that I shot at a recent motorcycle event. I prefer to work from my own reference material because I like knowing the piece is mine from beginning to end, and I enjoy the process of shooting good reference material. Additionally, I know there won’t be any copyright concerns using my own photos versus painting from someone else’s images.
When I process the film, I always order two sets of prints. This allows me to have a backup print in case my reference material gets damaged or lost in the process of working on the painting. I don’t want to be left without a reference photo under a tight deadline and wait for new prints to be made.
I start by projecting and drawing the image onto the canvas with a .5 mechanical pencil. Once the image is drawn, I spray it with workable fixative, which allows me to work on the piece without smudging the drawing, which might cause the canvas to appear dirty. The goal when projecting the image is to put enough information on the canvas to work. Not every detail is necessary for the drawing process, and the more lead on the canvas, the more danger exists of having a potentially smudged drawing. Care must be taken to draw lightly so that the lead doesn’t show through the final painting.
Step Two: Masking
Because of the scale of my work and my preference for canvas as a surface, I tend to work with masking tape and hand-masking units with masking papers. And I don’t cut corners on the quality of the masking tape. In my experience, 3M masking tape works best because it doesn’t leave residue on the canvas surface and is easy to remove. I keep 1/8″, 1/4″, 1/2″, 3/4″, 1-1/2″, 2″ and 3″ rolls on hand.
For masking paper, I prefer 12″ wide rolls commonly used by house painters. Additionally, I find painters’ tape [a 2″ wide rolled paper with a light adhesive on the back] very handy for the quick masking of small areas. Most of all these materials are available at most hardware stores or home improvement centers.
I start by covering areas I’m not ready to paint by masking the shapes with 1/8″ or 1/4″ tape, using other sizes as needed, then I fill in larger areas with tape and paper. I burnish down the edges of tape everywhere with my hand, and where the tape crosses over other pieces, I use my fingernail to ensure that the intersections are secure. Burnishing prevents the paint from seeping under the tape and leaving a rough edge. For highly detailed sections, I will sometimes lay down a large piece of masking tape and cut pieces out with an X-Acto knife in the same way that I would cut Frisket. I always use a new blade and am extremely careful not to cut into the canvas’ surface.
Experience has told me how important it is to make sure all areas are thoroughly masked and that paper covers everything I don’t want overspray to find. I never assume that because an area is several inches from where I’m painting, it won’t pick up overspray, as overspray tends to travel quite a distance. The paper is also helpful to test my airbrush spray before applying paint to the canvas.
Step Three: Background
Now that my canvas is masked, I start spraying my background with an Iwata HP-C airbrush. Com-Art transparent and opaque airbrush paints will be used for the complete painting. I’ve started to block in the background area with opaque Iron Yellow to create a warm feeling in my painting. This is only a base color, as I will add many other colors to create a realistic yet soft-focus background.
Next, I add textural areas, in what could be described as “controlled scribbling” of opaque White, transparent Black mixed with transparent Bright Red, a variety of transparent and opaque colors including Raw Sienna, Burnt Sienna, Raw Umber and other warm earth tones.
When I’m happy with the general feeling of the background, I spray over the entire area with various blends of White mixed with some of the colors I’ve used earlier to soften the background colors. I like to paint my background out of focus so that the motorcycle image is crisp by comparison, bringing it to the front of a painting and adding depth to the finished work.
Once the paint is dry, I remove the masking tape and paper. I always give the painting a day of rest before masking over painted areas to make it thoroughly dry.
Step Four: Tanks And Fenders
I start work on the motorcycle by painting the tanks and fenders first. I prefer leaving the chrome for last since all other colors are reflected in the chrome. I like the colors in my reference photo, so I’m painting the bike pretty much as I see it. In preparation, I mask the areas to be painted in the same way I previously masked the background. Additionally, I use clear acetate sheets [I prefer 3-5 mil. sheets] to define the crisp edges and reflection areas within the masked areas. I draw the shapes onto the acetate pieces I plan to use later with a permanent fine-line marker. I also make reference marks by tracing around some acetate areas and marking a few Xs onto the acetate and masking tape to assist in repositioning my masks. If I need to create a crisp edge, I can either hinge the piece with some tape or use a little repositionable spray adhesive to hold the acetate masks in place while painting. If I’m looking for a softer edge, I can simply hold the acetate away from the surface while spraying.
Additionally, I use Artool Airbrush Templates and other shields to create quick edges as needed. I mix enough paint to do the immediate areas and still have some left for the chrome areas. My primary blue for the tank and fenders is a mixture of opaque Phthalo Blue, opaque Ultramarine, transparent Ultramarine, and a little transparent Bright Red. I mix a combination of opaque Phthalo Blue, transparent Ultramarine, transparent Violet, and opaque Repro Cyan [creating a deep purple] for the dark blue areas. Many of the highlight areas include opaque Cobalt Blue, my special “chrome blue”, and White. I start by blocking in the main blue color without much regard for gradations and blends at this point. I’m simply establishing the bike’s base color. I start with predominately opaque colors for quick coverage. Once those areas have dried, I apply shadows and reflective colors by freehand painting and using acetates and hand-held shields. When creating acetate shields, I score the acetate rather than cut it out. It is easier [and safer] to cut acetate with a light score and snap the pieces out rather than to cut them out directly. For the aqua blue highlights on the tank foreground, I mixed some opaque Cobalt Blue with a little transparent Kelly Green. With the exception of White and Black and previously mixed colors, most additional colors on the tank and fender are applied using transparent colors to create a polished look. I mask the areas I want to protect using masking tape and paper. Spraying both freehand and acetate templates, I establish reflections with my aqua mixture and White.
Step Five: Miscellaneous Items
Next, I paint all the small miscellaneous items–turn signals, speedometer, etc. Again, I want to save chrome for last. All other colors I introduce into those miscellaneous items will appear within the chrome’s reflections.
Step Six: Chrome
Since chrome has no color, I make sure that it includes all the colors that I have used and a few other colors that haven’t yet come into play. That’s also why I save the chrome for last. I want to make sure all the reflected colors are established and that the correct mixtures are available. My motorcycle painting is an outdoor shot, so I will need to use a blue representing the sky. I also use a lot of Black and White to paint chrome to establish contrast. White, of course, represent clouds in this particular piece. I have two different chrome blues that I’ve mixed to use. While both are made from the same colors, I’ve varied the mixtures of each a little to give me a warm and cool version. The mixtures for my chrome blues consist of equal amounts of opaque Repro Cyan and opaque White, some transparent Royal Blue and transparent Ultramarine, a small amount of opaque Phthalo Blue, and a very small amount of transparent Black. My sky blues [chrome blue] are more like blue-grays than straight blue; the splash of Black helps to kick it back a little so that it doesn’t look fake. The chrome blues may vary, but these mixtures work well for me. A quick chrome blue could also be made with transparent Ultramarine, some transparent Ochre, and a little transparent Black. Color mixing takes a little time and experimentation. The chrome pieces on this bike reflect more than just sky, however, so I’ve made a brownish-gray for the smooth pieces of chrome that are reflecting the ground. This earthy gray is a mixture of all the browns I used for the background with some added transparent Black. There is also a red building that is reflected in the bike, so I mix my building colors before starting to paint. That red color will appear many times throughout the painting, which will help to add even more realism to the finished piece and help to place the motorcycle somewhere other than in a big empty parking lot in the middle of big nowhere. Before I start painting, I invest quite a bit of time studying my reference photo to understand what is being reflected in the chrome. I use a magnifying glass and examine the details of the photo. Decisions are made as to what stays and what simply is not important enough to invest time in a painting. I want the painting to be realistic but not confusing to the viewer. A hundred motorcycles reflected in the chrome might seem like a great idea at first, but experience has told me otherwise. Since there are a lot of pieces in a motorcycle, I paint many different pieces at the same time by looking for pieces that are similar in reflected colors. This also helps to minimize masking. I started with the headlight area because it’s the centerpiece of the painting–due to its shape and reflective intricacies. In a sense, I want to get the harder area done first. After masking off everything except the headlight and a couple of other areas, I use my chrome blues and White to paint the sky’s reflection and clouds. Using templates and acetate, I approach chrome in the same way I did the tank and fenders. Crisp edges are essential in painting chrome, so any hand-held templates need to be kept close to the surface when spraying. I start by freehand painting in general with my lighter chrome blue. I’m not too concerned about being exact at this point since I’ll be coming back to these areas with other colors and templates to define them. Darker chrome blue is sprayed to establish depth in the chrome. Next, I use a small fine line paintbrush and the same paints I use to airbrush to paint black solid areas and lines. These go pretty fast and, since I’m creating crisp edge lines, a brush for this application is the logical choice, rather than cutting a lot of acetate masks. A mahl stick is a convenient tool when hand-painting areas of this size. Mahl sticks are available at most sign supply shops and are used to support the hand above the surface of the painting. As I hand-painted with a brush, I only use Black where Black exists. My objective is not to outline everything in Black; I’m creating a “realistic” looking piece here. So, while the chrome is looking too bold at this point, my plan later is to airbrush over much of the black to add highlights, color, and detail and soften some of the crisp edges a little. Once the Black is brushed in, I airbrush chrome blues, whites and other colors using cut acetate stencils. First, I spray my Chrome no. 1, which is the brighter blue of the two. Then I spray my Chrome no. 2. Once my blues are done I define shapes with the browns, blacks [transparents and opaque], and White. After airbrushing my colors, I go over the black again and add whites with a fine line paintbrush to create contrast. Sometimes, I throw in a few brushed lines of the other colors [including chrome blue] as well. I finish the masked areas before moving to other crisp chrome pieces, but I paint them all the same way for consistency. Ultimately, painting chrome is a process of working with airbrushes and paintbrushes to create the final illusion– not to say that you couldn’t produce the desired effect with only an airbrush or paintbrushes– but this process works well for me. However, not all of the chrome areas are crisp. Some parts of the bike, because of their relationship to other pieces or out of focus, are softer in nature. Polished aluminum is also much like chrome, but has a softer finish than chrome. The motorcycle’s forks are a good example of this. While they are chrome, they are much less detailed than most other pieces. I mask the larger areas and completely freehand the shapes with an airbrush to paint these. Details are added with a few hand-held templates and acetate masks, that is kept slightly away from the surface to achieve softer edges. Paintbrushes are rarely used for the softer pieces.
Step Seven: Braided Cables
I start by masking off the areas to be painted. Then, using a small paintbrush [I prefer a number 1 size brush], I hand paint the cross-hatched texture of the braided steel cables as seen in the wiring, clutch, and brake cables, using colors from my existing color palette. An airbrush is used to add highlights, shadows, and reflected colors to the finished effect.
Step Eight: Finishing Details And Touch-Up
Once the complete painting is unmasked, I do general touch-up work. Using small paintbrushes, I apply colors to clean up some of the edges where paint may have worked its way under the tape, or I touch up some of the curved shapes to hide masking seams and tie all the pieces together a finished look. This is important so that the painting doesn’t look like just a bunch of pieces cut out and placed next to each other. Additionally, I find that the pieces “reveal” themselves as the painting has progressed. Sometimes, when a painting is in its beginning stages, it’s not completely obvious what all the shapes might represent. They may be reflections or shadows. As the painting progresses, those shapes become more apparent, so now is my chance to make those final adjustments.
I also cut some more acetates and added some additional highlights as needed. One of the last things I do is add the small bursts of light reflections throughout the chrome. While they may look like a glow of White at first glance, there really is more to it than that. I start with a small, soft, airbrushed glow of straight White, and then I add a little red around the outside of the glow. Next, I go over it again with more White, leaving some red on the glows’ outside edges. This extra effort helps to bring the painting together.
The canvas I’ve used is 1-1/2″ thick (I like the clean look of unframed art), so, aside from signing the painting, my final step is to paint the edges of the canvas with black acrylic paint. This gives the piece a clean contemporary look.
Step Nine: Protecting The Finished Painting
Once the painting is complete, it’s ready for a good coat of clear. Technically, I could clear the next day or even the same day in some cases, but I like to give the painting a couple of days of rest and look at it with “fresh eyes” once more before clearing. This is pretty much my last chance to add details or make changes that I might not have seen before. I spray my paintings with Krylon Crystal Clear acrylic coating, which provides a permanent protective gloss coating and helps to unify the finished product. Clearing also pops the contrast a little, which is great for paintings of shiny subject matter.
I start by spraying a light, horizontal coat and then add a couple of additional heavier layers in both horizontal and vertical directions, overlapping each coat slightly. I always apply multiple coats rather than one heavy coat to prevent possible sags and runs. Weather permitting, I try to do the clearing process outdoors, or if that’s not possible, in a well-ventilated area.
In Conclusion
In total, this painting took me approximately 75 hours to complete. For me, always, the most important thing is just to get in there and paint. It’s a time-consuming process that I remember to take one step at a time. Ultimately, all who want to add chrome and reflected surfaces to their repertoire will develop their style and techniques for painting these special effects.
The Ultimate Airbrush Handbook by Pamela Shanteau offers a comprehensive guide to airbrushing. This book covers the basics to help the beginner get started but is full of insights that will benefit even experienced airbrush artists. Topics include equipment and material selection, airbrush operation, studio set up, how to run an airbrush business and delves into specific applications ranging from illustration to nail art, and much more.
- About the Author
- Latest Posts
- More info

A.D. is an artist who started drawing at a young age. Throughout his life, he has worked with different creative tools in traditional and digital art and design. His art and writings are showcased in various publications such as Airbrush Action Magazine, Airbrush Magazine, American Art Collector, America’s Sports Car magazine, Art & Beyond, Easyriders, Las Vegas City Life, Las Vegas Weekly, L’Vegue, ModelsMania, Quick Throttle, The Ultimate Airbrush Handbook, America’s Sports Car, The New York Times, and The National Corvette Museum 2024 Annual Report.